You are currently browsing the daily archive for October 9, 2007.
This weekend on a beautiful fall day we visited Florida Canyon in the Santa Rita Mountains, which are directly south of Tucson. The canyon was lush and colorful, and the insect activity was impressive (we’re entomologists, so that’s a good thing).

A morning glory vine (Ipomoea hirsutula?). These were fairly common in the canyon, especially on shady cliffsides.

An adult giant mesquite bug (Thassus sp.). These insects produce noxious defensive compounds; the nymphs are strikingly colored (red, white and black), a clear example of aposematic (warning) coloration.

Desert cotton (Gossypium thurberi). These beautiful plants were very common in the canyon, and many of them exceeded seven feet tall.

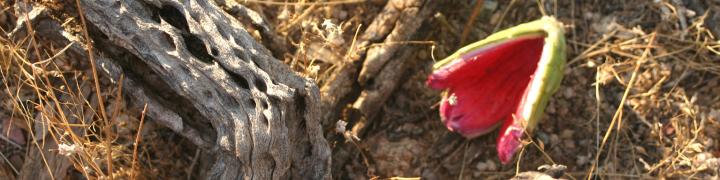
Scarlet creeper (Ipomoea coccinea), another species of morning glory. We only saw a couple of these plants, but they were striking.

Oak galls. These growths are induced in oaks (Quercus spp.) by insects, especially by tiny wasps. The galls nourish and protect the insects, which develop within them.

Acorns on the ground. We found only a couple of oak trees which were still producing acorns. We harvested a small amount in the hopes of producing acorn flour, but when we got home we discovered that they had almost all been colonized by some sort of larval insect (probably a fly of some kind). We did manage to harvest some juniper berries, which are delicious!

Algal growth in a pool. The stream in Florida Canyon was low but it was running, and some pools such as this one were supporting dense algal populations.

A native cucurbit, the coyote gourd (Cucurbita palmata). The flesh is supposedly edible, and edible cooking oil can be extracted from the seeds, but we didn’t try.
We’ve gotten a bit behind in our blogging, so we’re going to try to churn out a few posts today. First I want to write about our new fall and winter garden, which we finally got planted last weekend. In a previous post I described our philosophy and goals for sustainable gardening. This new garden demonstrates some of the ways in which we’re trying to achieve the goals we outlined previously.
In previous years we’ve grown fall and winter crops in two spots in our back yard. The first year we planted in a plot which wraps around the northeast corner of our house. This was clearly not a good location for a winter garden, as it’s pretty well shaded by the house. The second year we tried a sunnier location, on the south side of our shed. This has proven to be a fantastic spot for both winter and summer gardening, as it gets a little bit of shade during the summer from a velvet mesquite to the south, but is mostly unshaded during the winter since the afore-mentioned velvet mesquite is semi-deciduous and drops many of its leaves in late fall. At the moment this plot is already planted in summer crops (amaranth, devil’s claws, tepary beans, sorghum, and lemon cucumbers), but once they are done we will replant it in winter crops.
The new plot is just south of our north fence, in the most exposed location in our yard. This placement provides maximal solar gain during the winter, but makes it a poor location for a summer garden (unless we rig some sort of temporary shade structure). During the summer this area of the yard becomes filled with native amaranth (Amaranthus palmeri), purslane (Portulaca oleracea) and Boerhavia sp. The amaranth and purslane are edible and we make good use of them, and we believe that the Boerhavia is edible as well but want confirmation before we eat much of it.

The location of our new fall garden prior to digging the garden beds. The “weeds” in the picture are predominantly Boerhavia sp. and Amaranthus palmeri, with some Bermuda grass (Cynodon dactylon) in the foreground.
The plot is sloped both east to west and north to south, so we decided to divide it into three separate beds, each of which would be level but at a different elevation from the others; they would be separated from one another by shallow berms to prevent water from running off and pooling in the lowest bed.
We began by clearing all the vegetation from what was to become the garden beds. We saved this material to use later as mulch. We next “triple-dug” the beds: we shoveled off the topsoil down to about six inches deep and put it aside in a large heap. We then used a pick to break up the first layer of caliche (a dense calcium carbonate layer in our desert soils), down to about a foot deep, and removed this to another heap. Finally, we used the pick to break up another six inches of caliche, and left this in place. If it wasn’t such difficult work we would have gone even deeper, but we broke up enough caliche to provide for decent drainage.

The new fall garden plot.
We next added back the topsoil we had removed earlier, but left out the caliche we had removed. The beds were therefore sunken several inches below the surface, providing for a nice rainwater catchment system. We still have to figure out what to do with the pile of caliche – eventually we’ll probably have a need for some extra soil somewhere, but for now it’s just sitting there.
The next step was to add soil amendments. Although we want to avoid bringing in external inputs, when starting new beds we have found it very helpful to add a little bit of outside compost and manure, as our soil otherwise has very little organic matter. This time we mixed in just a single small bag of compost and a single small bag of steer manure. It’s clear that this did not provide enough organic matter, as the soil is already getting compacted. We also added a small bucketfull of chicken manure from our chickens. Most of this manure was fairly old and had already had a chance to age, so I wasn’t too worried about it burning the plants (it’s worked well in the past, at least). As an experiment we decided to also add some locally-made organic fertilizer.
The final additive was a bag of mesquite charcoal, which I broke up using a shovel and mixed into the soil. This is my lame attempt at emulating biochar; although charcoal apparently doesn’t work as well as true biochar (to improve water retention and growth of beneficial microbes, among other things), it has seemed to improve our soil in previous gardens. We also spread a second bag of mesquite charcoal on the surface, which should act as mulch and also help warm the soil during the winter.
As an additional experiment we placed several large rocks throughout the garden. These should serve several functions. First, like the charcoal they should help warm the garden during cold spells. The main benefit is that they should act as water traps, since water can’t evaporate through them. In theory they should help retain water in the soil beneath them, which the plants’ roots can tap into. I got this idea from reading Jared Diamond’s book Collapse, in which he describes how the Easter Islanders used boulders in their gardens for similar purposes. The rocks also provide us with convenient stepping stones (literally) to get at spots in the garden which are otherwise awkward to reach.
For an initial mulch we spread the vegetation we had cleared earlier. This proved to not be an adequate amount of mulch long-term, but this is actually a good thing as it will not smother the seeds we planted. Once the plants are larger we will add additional mulch to improve water retention and warm the soil.
The final step was the planting. We decided to mix a diversity of crops, some of which we’ve grown before but some of which are new to us (those marked with an asterisk were planted using seeds we saved from last year’s garden):
- I’itoi onions*: a small shallot-like onion grown by the Tohono O’odham; the stems are edible and delicious, in addition to the bulbs; originally from Native Seeds/SEARCH
- Shallots: we planted a single true shallot just to see how it would do
- Garlic
- Potatoes: Yukon Gold and Red La Soda
- Fava beans: from Native Seeds/SEARCH
- Garbanzo beans*: from Native Seeds/SEARCH
- Mixed greens*: arugula, collards, and some Asian greens we haven’t identified
- Mayo quelite: a Mexican green from Native Seeds/SEARCH
- Cilantro*
As this is very much an experimental garden we did not plant a lot of any one crop. Once our summer garden is finished we will replant it with winter crops and will grow larger quantities of greens, cilantro, and onions, at least. I also want to experiment with growing wheat and quinoa.
So how did we do with our goals for sustainable gardening?
- Avoiding external inputs of mulch, manure, fertilizer, or other soil amendments in favor of chicken manure, compost and mulch derived on-site (As this was a new garden plot we decided to bring in external inputs. We did use chicken manure and mulch derived on-site, however.)
- Avoiding use of synthetic biocides (Fully achieved.)
- Avoiding use of municipal water by maximizing rainwater harvesting (using berms and sunken beds to channel runoff to the garden) and minimizing evaporation (by using mulch and shade) (I think we met these goals pretty well. We’ll see how effective our strategies are, but for now this seems to be a strong point of this garden.)
- Minimizing tillage of the soil to reduce erosion and promote healthy soil microflora and microfauna (Since this was a new bed it was impossible not to till.)
- Intercropping with a high diversity of plants to reduce disease transmission and pest infestations (We pretty thoroughly intercropped everything. Unfortunately we forgot to research if there were negative interactions between any of the plants we planted. Hopefully there won’t be any problems.)
- Emphasizing native crop species adapted to our local conditions (We planted several crops traditionally grown in the region, though probably none of them are truly native to the region.)
- Emphasizing perennial species (which have a number of advantages over annual crops) (Some of the things we planted are arguably perennial under certain conditions, but probably will not be under the conditions in our yard.)
- Encouraging edible native “weeds” (We will see how this goes as weeds begin to germinate. Already we are having to combat Bermuda grass, but I don’t foresee this being a major problem.)
We’ll be writing more about this garden as it grows and as we harvest from it.

Recent Comments